Home › Recipes › Cookies & Snacks
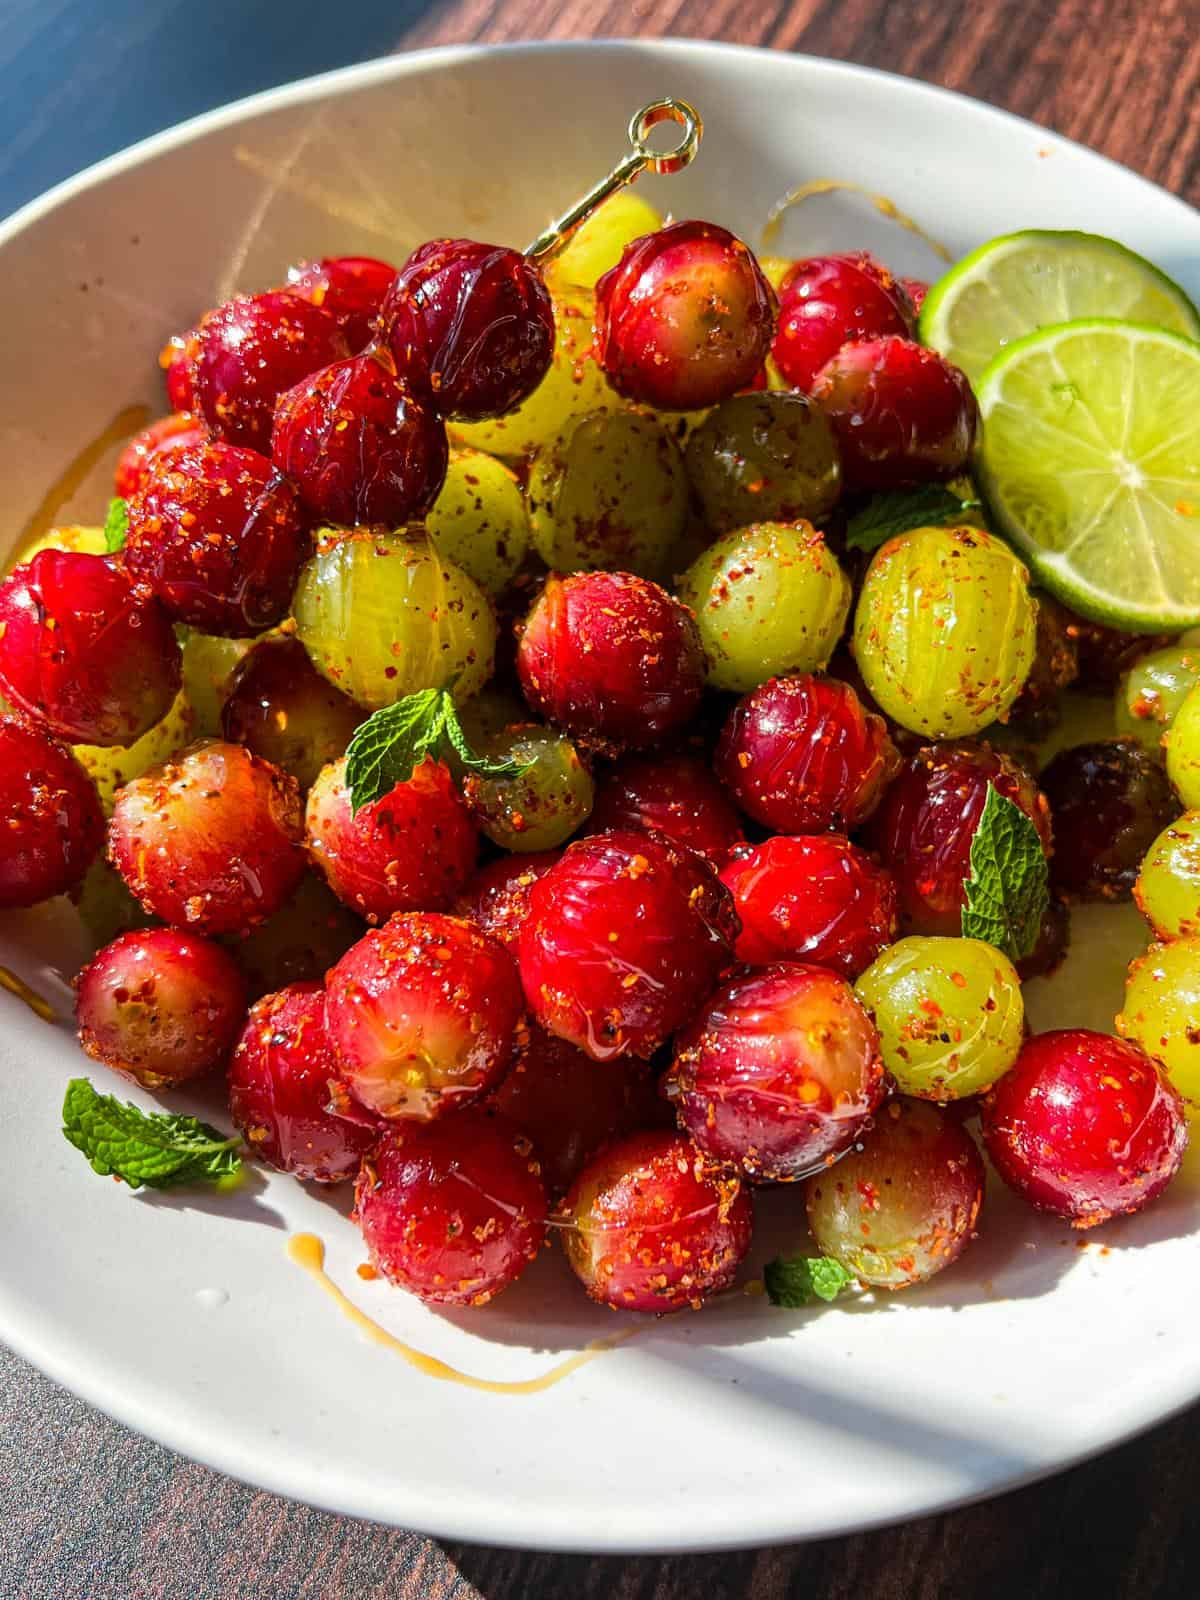
DIY Frozen Sour Grapes

By Snejana Andreeva
on Jul 05, 2025, Updated Jan 28, 2026

If you’ve ever tried the viral Fruit Riot Sour Grapes 🍇, you know why recreating them at home was an absolute must. The concept is pretty simple, but the elite flavor and texture combo makes them wildly addicting! I’m talking, eat-the-whole-bag-in-one-sitting type of addicting 😩. But fear not. If these irresistibly overpriced tangy little gems also have a hold on you, I am here to release those shackles ⛓️💥 with my Frozen Sour Grapes DIY version . They are so simple to make, and the customization options are endless. The best part? They only take 5 minutes to prep, and after that, it’s just a matter of waiting for them to freeze into little sour bites of perfection.
- Why You’ll Love DIY Frozen Sour Grapes
- Ingredients
- Nonna’s Tip 🍇
- DIY Frozen Sour Grapes Tips for Success
- Frozen Sour Grapes Variations and Substitutions
- Best Served With
- Similar Recipes
- Frozen Sour Grapes Recipe
- Common Questions
View this post on Instagram A post shared by Snejana Andreeva (@themodernnonna)

Why You’ll Love DIY Frozen Sour Grapes
Warning: This recipe may cause a serious grape addiction! I’m not kidding, the first time I made these, I finished the whole batch and made another one within the same day 😅. When you bite into these Frozen Sour Grapes you get that icy 🧊, crunchy pop , immediately followed by a sour tang from the citric acid and lime that makes your mouth pucker in the best way possible. The Tajin adds a spicy and slightly salty kick, while the hot honey 🍯🌶️brings the sweet heat that takes these Frozen Sour Grapes to new heights. It’s like your favorite sour gummy, but refreshing, juicy and way more satisfying.
Ingredients
🍇 Grapes: For grape choice, any seedless variety works great, but green grapes tend to be the sourest and crunchiest when frozen. Red or black grapes will still be delicious, just slightly sweeter. I’ve tried this recipe with red and green grapes, and both work wonderfully!
🍋🟩 Lime: Lime adds that bright, zesty punch, but more importantly, the lime juice is what helps the citric acid and Tajin stick to the grapes, so don’t sleep on this key ingredient!
🧬 Citric Acid : Don’t let the acid part scare you off. Citric acid is a weak organic acid that occurs naturally in citrus fruits like lemons and limes. It’s what puts the “sour” in our Frozen Sour Grapes.
🌶️ Tajin: A popular Mexican seasoning blend known for it’s chili, lime and salt combo, Tajin is the perfect match for the lime and citric acid in this recipe. Of course, if you’re not a fan of Tajin, feel free to leave it out.
🍯 Hot Honey: My ultimate condiment and the perfect final touch to make these already delicious Frozen Sour Grapes the snack of your dreams.
Nonna’s Tip 🍇
Dry your grapes really well so the sour coating sticks. For extra tang, let them sit in the mixture for 10–15 minutes before freezing.
DIY Frozen Sour Grapes Tips for Success
- Taste as you go : Once you coat all your grapes, try one of them before you commit to freezing the entire batch. This way you ensure the level of sourness is on point.
- Let the 🍇 marinade : This is completely optional, but letting the grapes marinade in the lime, citric acid and Tajin mixture for 10-15 minutes ensures a deeper, more intense flavor.
- Dry the grapes well : Pat them all the way dry so the coating mixture sticks well and doesn’t slide off.
- Freeze Long Enough : I know you’ll probably be impatient the very first time, but trust me, they are worth the wait. Freeze ❄️ the Sour Grapes for at least 2-3 hours to get that crisp, candy-like snap.
- Use a baking sheet : Spread the coated grapes on a baking sheet to prevent them from sticking to each other when they freeze. Later on you can transfer them to a zip-lock bag and store them in the freezer.
Frozen Sour Grapes Variations and Substitutions
- Choose any seedless grapes you enjoy! Green grapes tend to be the best fit for this recipe since they are crunchy and slightly sour by nature, but red and black grapes 🍇work well too!
- Not a grape fan? Try this recipe with pineapple chunks 🍍, watermelon cubes 🍉 or pieces of mango 🥭, strawberry 🍓 or kiwi 🥝.
- If you want your grapes less sour, simply add less citric acid. You can also add a sprinkle of coconut sugar before freezing.
- Instead of lime, feel free to use lemon juice, orange juice, grapefruit juice or pineapple juice. You can use any juice as a base, but it may change the flavor and make the grapes less sour.
- Add some more texture by adding shredded coconut 🥥 or crushed, freeze-dried fruit powder to the mix.
- Drizzle these Frozen Sour Grapes with Chamoy instead of hot honey for a less spicy but more tangy twist!
- No citric acid? No problem! Use extra lime juice 🍋🟩 and a bit of lime zest for a milder, more natural tang.
Best Served With
- If you want to go all the way DIY, make my homemade Hot Honey to drizzle on top of these Frozen Sour Grapes.
- Keep things refreshing with my Brazilian Lemonade or Strawberry Watermelon Drink .
Similar Recipes

Mango Frozen Yogurt
6 hrs 5 mins

Strawberry Smoothie Bowl
20 mins

Air Fryer Pineapple
15 mins

Fruit Leather (Lavashak)
8 hrs 5 mins
A New Recipe Card!!
- Check off each step in instructions!
- Add ingredients to your shopping list!
Equipment
- ▢ Mixing Bowls
- ▢ Baking Sheet
Ingredients
- ▢ 1.5 lbs grapes
- ▢ 1 lime , juiced
- ▢ 1 teaspoon citric acid , as sour as you like it
- ▢ Tajin , to taste
- ▢ hot honey , drizzle before serving
Instructions
- ▢ Wash and dry the grapes thoroughly.
- ▢ Once dry, add them into a bowl with lime juice, and citric acid (for that sour punch).
- ▢ Add the Tajín . Toss, place on a baking sheet and freeze.
- ▢ Once frozen, take them out and add a drizzle of hot honey on top (spicy honey). Enjoy!
Nonna’s Notes
- Dry grapes well so the coating sticks.
- Let sit in the mix for 10–15 mins before freezing for more flavor.
- Freeze in a single layer for at least 2–3 hours .
- Drizzle hot honey after freezing for best texture.
- Adjust citric acid and Tajín to taste.
- Try with other fruits like pineapple or kiwi .
- No citric acid? Use lime juice + zest .
- No Tajín? Try chili powder + salt + lime zest .
- For a twist, use chamoy, agave, or balsamic glaze instead of honey.
- Soak in rosé or tequila for a fun adult version.
My Notes
Nutrition
Nutrition information is automatically calculated, so should only be used as an approximation.
Common Questions
Any seedless variety works great, but green grapes tend to be the sourest and crunchiest when frozen. Red or black grapes will still be delicious, just slightly sweeter.
Citric acid is the naturally sour compound found in citrus fruits. You can find it in the spice or canning section of most grocery stores, or online. It gives that classic “sour candy” zing.
You can, but the grapes won’t be as sour. If you’re looking for that tangy punch, citric acid is key.
Freeze them for at least 2–3 hours, or until completely solid. You can also leave them overnight.
Yes! Just store the frozen grapes in a sealed container or zip-top bag in the freezer, then drizzle the hot honey right before serving.
It helps prevent them from sticking together. If you don’t have one, lay them on a plate or tray in a single layer and transfer to a container once frozen.
Frozen Sour Grapes
Equipment
- Mixing Bowls
- Baking Sheet
Ingredients
- 1.5 lbs grapes
- 1 lime juiced
- 1 teaspoon citric acid as sour as you like it
- Tajin to taste
- hot honey drizzle before serving
Instructions
- Wash and dry the grapes thoroughly.
- Once dry, add them into a bowl with lime juice, and citric acid (for that sour punch).
- Add the Tajín . Toss, place on a baking sheet and freeze.
- Once frozen, take them out and add a drizzle of hot honey on top (spicy honey). Enjoy!
Notes
- Dry grapes well so the coating sticks.
- Let sit in the mix for 10–15 mins before freezing for more flavor.
- Freeze in a single layer for at least 2–3 hours .
- Drizzle hot honey after freezing for best texture.
- Adjust citric acid and Tajín to taste.
- Try with other fruits like pineapple or kiwi .
- No citric acid? Use lime juice + zest .
- No Tajín? Try chili powder + salt + lime zest .
- For a twist, use chamoy, agave, or balsamic glaze instead of honey.
- Soak in rosé or tequila for a fun adult version.
Nutrition
Frozen Sour Grapes https://themodernnonna.com/diy-frozen-sour-grapes/ July 5, 2025
Home › Recipes › Cookies & Snacks
Lemon Cheesecake Thumbprint Cookies
By Snejana Andreeva
on Dec 15, 2022, Updated Nov 08, 2023
My lemon cheesecake thumbprint cookies melt in your mouth . This recipe is one of those recipes that you’ll need to triple, because it’s THAT good. 🍋Whether you’re a lemon lover or simply looking for a unique and delicious cookie, these Lemon Cheesecake Thumbprint Cookies are a must-try. They’re perfect for any occasion, from a casual afternoon tea to a fancy dessert spread.
- Why You’ll Love Lemon Cheesecake Thumbprint Cookies
- How to Prepare
- Nonna’s Tip 🍋
- Lemon Cheesecake Thumbprint Cookies Variations and Substitutions
- Other Holiday Recipes
- More Holiday Cookies
- Common Questions
- Lemon Cheesecake Thumbprint Cookies Recipe
Why You’ll Love Lemon Cheesecake Thumbprint Cookies
These lemon cheesecake thumbprint cookies are ideal for anyone who cannot tolerate 🥚 eggs as they are completely egg-free . The dough takes 5 minutes to whip up, so these cookies are easy enough for anyone who is not even a baker. They’re only 5 ingredients , which you probably already have on hand. I can honestly say that this is one of those cookie recipes that you cannot get enough of.
How to Prepare
🥣 Use a stand mixer with the paddle attachment or a hand-held mixer and bowl to cream butter and cream cheese for about 2 minutes until smooth.
🍋 Add sugar and lemon extract and mix until smooth . Then add flour, and mix until a sticky dough forms. Scrape down the sides to fully incorporate any remaining flour.
🧊 Cover the cookie dough with plastic wrap and refrigerate for one hour.
🥄 Remove dough from the refrigerator, use a small ice-cream scooper to portion the cookies, rolling each in a touch of flour to prevent sticking.
🍓 Place rolled cookies on a baking sheet lined with parchment paper . Flatten each with your thumb, creating an indent, and add a teaspoon of preferred jam/preserve to the center.
🔥 Preheat the oven to 350°F and bake the lemon cheesecake thumbprint cookies for 13-15 minutes or until the edges are light and golden brown .
❄️ Allow the cookies to cool completely and optionally dust with icing sugar. They can be stored at room temperature for up to a week.
Nonna’s Tip 🍋
You MUST refrigerate the cookie dough for at least one hour and you have to use a touch of flour to roll each one as they will stick.

Lemon Cheesecake Thumbprint Cookies Variations and Substitutions
- Try adding a decorative topping like chopped nuts or a sprinkle of coarse sugar for holiday decoration.
- I have not tried this recipe with gluten-free flour , but feel free to experiment with a gluten-free 1-1 replacement and let me know how it goes!
- Instead of lemon extract , you could try almond, vanilla, orange or another you have on hand.
- Feel free to experiment with different jams or preserves , for example, you could use strawberry, raspberry, apricot or even marmalade.
- You could try dairy-free or vegan alternatives to the butter and cream cheese if you or your guests have allergies.
Other Holiday Recipes

Antipasti Christmas Wreath
10 mins

Holiday Butter Board
20 mins

Holiday Candy Cane Prosecco
5 mins

Holiday Cheese Board
20 mins
More Holiday Cookies
Looking for an even fancier-looking cookie? Try my puff pastry cookies .

Easy Gingerbread Cookies
3 hrs 23 mins

Italian Amaretti Cookies
25 mins

3 Ingredient Sugar Cookies
20 mins

Shortbread Butter Cookies
27 mins
Common Questions
Feel free to use any jam or preserve you enjoy. I love fig or apricot but you are more than welcome to use any you have on hand.
The lemon extract is optional so don’t worry if you don’t have any on hand. You can also use pure vanilla extract, or almond extract, or leave them plain. Or, if you don’t have pure lemon extract, but still want the flavor, you can also use the zest of a lemon in the recipe.
You MUST refrigerate the cookie dough for at least one hour and you have to use a touch of flour to roll each one as they will stick.
Feel free to freeze the cookie dough tightly wrapped for up to 3 months. Thaw in the fridge and shape as usual.
The cream cheese and butter must be softened in order for the cookies to bake correctly.
You can use salted or unsalted butter. I have made them with both and both results are delicious.
While 1 cup of flour weighs 160g in my kitchen, it might weigh anywhere from 120 to 180g in your kitchen and there’s a few reasons for that. The weight of ingredients may vary due to the brand of ingredients, the brand and style (wet vs dry) of measuring cups and spoons, and the technique for measuring into cups: scooping and leveling versus spooning the ingredients into the cup measure. For best results, go by the weight listed in the recipe.
A New Recipe Card!!
- Check off each step in instructions!
- Add ingredients to your shopping list!
Video
Equipment
- ▢ Measuring Cups + Spoons
- ▢ Mixing Bowls
- ▢ Baking Sheet
- ▢ Parchment Paper
Ingredients
- ▢ ½ cup cream cheese , softened
- ▢ ½ cup white sugar
- ▢ 1 stick softened salted butter
- ▢ 1.5 teaspoons lemon extract , optional if you don’t have any on hand
- ▢ 1 ¼ cup all-purpose flour , + 2 extra tablespoons for rolling the balls
- ▢ 18 teaspoons jam , I used fig preserve
Instructions
- ▢ In a stand mixer using the paddle attachment, cream the butter and cream cheese together for about 2 minutes or until smooth. You can also use a hand-held mixer and a bowl as well.
- ▢ Once creamy, add the sugar and lemon extract and mix until smooth. Add in the flour and mix until a sticky dough forms. If there’s any flour on the sides, you can scrape it down and mix again until fully incorporated.
- ▢ Cover the cookie dough with plastic wrap and refrigerate for one hour. After an hour, take out the dough, remove the plastic and use a small ice-cream scooper to scoop out the cookies. I scoop each cookie, roll it in a touch of flour as it will stick to your hands if you don’t.
- ▢ Repeat this step for all 18 cookies. Place each rolled cookie onto a baking sheet lined with parchment paper. Press each one down with your thumb to make an indent. Add a teaspoon of any jam/preserve you like to the middle.
- ▢ Preheat the oven to 350F and bake until the edges are light and golden brown. This should take 13-15 minutes depending on the oven.
- ▢ Let them cool completely and optionally dust with icing sugar. These are perfectly stored at room-temp for up to a week.
My Notes
Nutrition
Nutrition information is automatically calculated, so should only be used as an approximation.
